The Southern Pacific Coast Line 2012-2013 work
This page was written blog style so the newest is at the top.
.
Click here to go to the beginning
To see the Minnesota layout that preceded this one, click here.
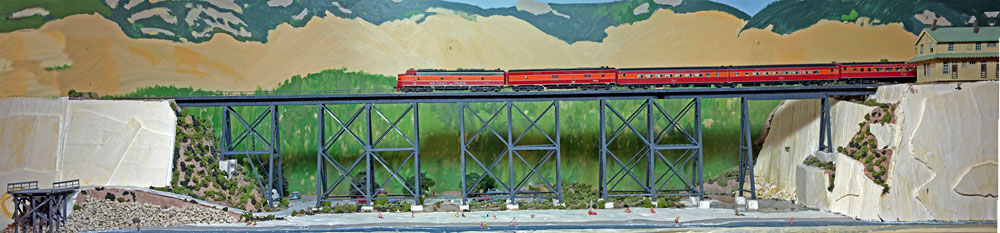
6/19 Finito! Finished. Done. The Gaviota scene is finally done. Here are some pictures showing the finished product.


 This one shows the creek which in the summer doesn't flow hard enough to breach
the sand.
This one shows the creek which in the summer doesn't flow hard enough to breach
the sand.

 Gaviota by moonlight. Given the number of people still up this train isn't
running on time.
Gaviota by moonlight. Given the number of people still up this train isn't
running on time.
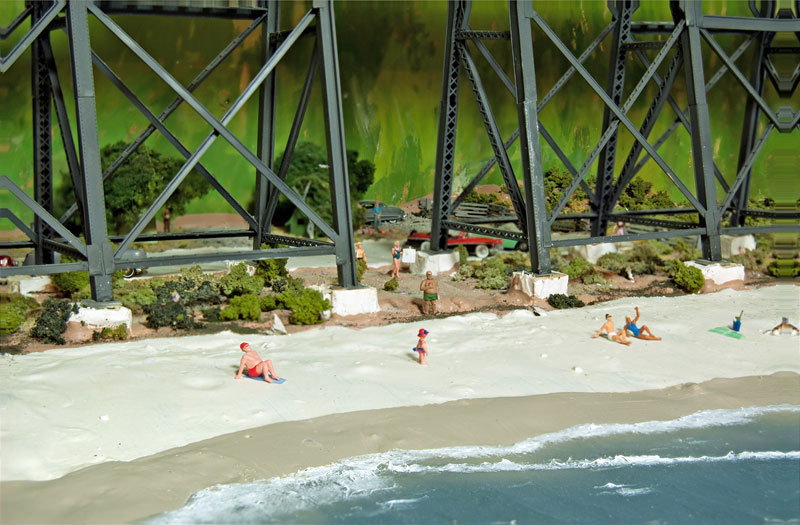
5/19 The beach at Gaviota is starting to take shape. The road to
the pier is on the left. The creek is at the far end just below the depot
perched on top of the cliff.

5/11 A trip to Disney World and lots of outdoor work has slowed
layout wok considerably but the Gaviota Trestle was finally completed today.
 The first train on the trestle.
 and the second. Now to put in the beach and finish the scenery.
4/11
 The trestle with (most) of the deck in place. Needs a few more boards and paint,
both of which should arrive while we are gone. If you expand the picture you can
probably see tents and a trailer in the campground. People to follow.
The trestle with (most) of the deck in place. Needs a few more boards and paint,
both of which should arrive while we are gone. If you expand the picture you can
probably see tents and a trailer in the campground. People to follow.
4/7 Everything painted and the bridge modules glued together. Waiting for the deck to be done before gluing to the piers.

4/3
 It has taken a long time but the trestle supports are finally finished. 4 more
bridges to build, then glue them all together, paint all the sub-assemblies. add
the wood beams that hold the ballast, glue bridges to supports, add handrails.
I'll finish this project someday.
It has taken a long time but the trestle supports are finally finished. 4 more
bridges to build, then glue them all together, paint all the sub-assemblies. add
the wood beams that hold the ballast, glue bridges to supports, add handrails.
I'll finish this project someday.
3/20 Most of my time this month has gone into working on the Gaviota scene. Making the trestle has been time consuming. Likewise getting the trestle pier supports setup correctly was definitely a case of measure once, cut twice. Repeat. But it has all come together except for some pieces needed to complete the trestle and they do not appear to be readily available.
First a couple of real Gaviota shots. Here you can see
that the basic support structure has the piers tied together in groups of three
with a gap between each group of three.
 .
From this side the two set of piers on the right end of each set are made of
riveted box beams like this
.
From this side the two set of piers on the right end of each set are made of
riveted box beams like this
 while the third set is made up of H beams like these
 The earliest picture I have shows that it was originally built with just the box
beams connected in pairs with a gap between them. At some point in it's
history the H beams were added to give it additional strength. So much for
history. I have built the necessary box beam structures-here are three
pairs on the layout
The earliest picture I have shows that it was originally built with just the box
beams connected in pairs with a gap between them. At some point in it's
history the H beams were added to give it additional strength. So much for
history. I have built the necessary box beam structures-here are three
pairs on the layout
 My problem is that I can't find enough H beams to finish the job plus I'm still
waiting on some stuff that I hope will be useful for connecting the H beams
together and to the box beam pairs.
My problem is that I can't find enough H beams to finish the job plus I'm still
waiting on some stuff that I hope will be useful for connecting the H beams
together and to the box beam pairs.
While waiting for those parts I have cleaned up the campground,
added some trees and a couple of tents.

 I don't know how the campground was laid out in the 50's. I believe this
picture was taken in the 70's (that looks like an early 70's GMC motorhome in
the foreground). The trees look like they have been there a while so I
hope this is what thecampground looked like.
I don't know how the campground was laid out in the 50's. I believe this
picture was taken in the 70's (that looks like an early 70's GMC motorhome in
the foreground). The trees look like they have been there a while so I
hope this is what thecampground looked like.

2/19
 The support structure for the end of the Gaviota
trestle. the end of the trestle rests on the tall wood block next to the pink
foam board. The first pier will be a short one and will be supported by the pair
of boards. The next pier will be a tall one and will be supported by the two
small blocks in the creek bed. The pink foam board will support the the rock
cliffs. Here are three shots showing the real Gaviota Trestle
The support structure for the end of the Gaviota
trestle. the end of the trestle rests on the tall wood block next to the pink
foam board. The first pier will be a short one and will be supported by the pair
of boards. The next pier will be a tall one and will be supported by the two
small blocks in the creek bed. The pink foam board will support the the rock
cliffs. Here are three shots showing the real Gaviota Trestle


2/14 At the start of the Gaviota coast, in the corner of the
layout, we have a scene that has highway 101 in the background and the first
beach scene in the foreground
 .
The beach in the foreground is the nude, or clothing optional, beach at the east
end of Gaviota State Park. It is known as San Onofre north or Vista del
Mar for the old school that is near the parking place for the beach. On my
layout, it is known as Haack's beach because they gave me the figures. It
also fits in with Black's Beach north of San Diego and Bates Beach in
Carpenteria. Here is a picture of the beach.
.
The beach in the foreground is the nude, or clothing optional, beach at the east
end of Gaviota State Park. It is known as San Onofre north or Vista del
Mar for the old school that is near the parking place for the beach. On my
layout, it is known as Haack's beach because they gave me the figures. It
also fits in with Black's Beach north of San Diego and Bates Beach in
Carpenteria. Here is a picture of the beach.

2/7 Work is progressing on the wall up the center of the garage
 .
This will be the Gaviota Coast as seen from the ocean side on the upper level
and San Luis Obispo on the lower level. The frames and wood supporting the
track shown here are temporary until the Gaviota Trestle is built.
.
This will be the Gaviota Coast as seen from the ocean side on the upper level
and San Luis Obispo on the lower level. The frames and wood supporting the
track shown here are temporary until the Gaviota Trestle is built.
 Temporary in this case could be a matter of years.
2/3 Took a break from building the layout and worked on one scene, the farm house. Day and night shots

 The night shot has the Starlight going by in the background.
2/1 February and today we put in the supports for the interior
wall.

1/31 the river more or less complete

1/26

1/23

1/22 the current project is putting a river onto the layout.
this shot shows where it is going, as well as the partially painted backdrop.
 And here we have the riverbed. The rocks along the backside of the river
canyon are left over from the Minnesota layout, as is the bridge that will span
this gap.
And here we have the riverbed. The rocks along the backside of the river
canyon are left over from the Minnesota layout, as is the bridge that will span
this gap.

1/20
 Added
a backdrop along the edge of the layout through the curve. Later today
I'll add the one across the front of the garage. then comes paint.
Update: Here are the first two sections of backdrop with their sky blue
paint. Clouds, hills, etc to follow.
Added
a backdrop along the edge of the layout through the curve. Later today
I'll add the one across the front of the garage. then comes paint.
Update: Here are the first two sections of backdrop with their sky blue
paint. Clouds, hills, etc to follow.
1/18 The framework across the front of the garage

1/15 The Main line and siding are now down to the garage door
 and a few details are starting to show up.. Concrete steps have been added so
people can get into the building and some weeds and grass are now visible.
and a few details are starting to show up.. Concrete steps have been added so
people can get into the building and some weeds and grass are now visible.

1/6/13 My brother Ted came to visit for the weekend and we got
two posts that run from floor to ceiling installed so the layout can begin to
turn the corner and head across the front of the garage.

1/2/2013 Started doing something about the foreground
scenery-brown paint and some stuff dropped onto the wet paint. A pair of
reefers loading up at the Salinas Lettuce Co. shows the current status 
12/29 A quick morning project, adding some distant hills and a
few clouds.

12/28 Track is laid and the first three building are in place
for the Salinas Valley portion. More bench work is needed to finish this
level. Since the Salinas Lettuce company ships lettuce in reefers, I
assume this box car is delivering empty boxes or some other supplies
 when I have more of the scenery finished I'll take the time to shoot this
picture from a tripod with several different settings so I can have the whole
picture in focus. Another shot of one the Salinas lettuce buildings. in
the far background you can just see a bit of scenicking, fake California Golden
Summer Grass.
when I have more of the scenery finished I'll take the time to shoot this
picture from a tripod with several different settings so I can have the whole
picture in focus. Another shot of one the Salinas lettuce buildings. in
the far background you can just see a bit of scenicking, fake California Golden
Summer Grass. And here is the Union Ice plant and dock. Another siding will be put in in
front of the existing siding so multiple reefers can take turns getting ice.
And here is the Union Ice plant and dock. Another siding will be put in in
front of the existing siding so multiple reefers can take turns getting ice.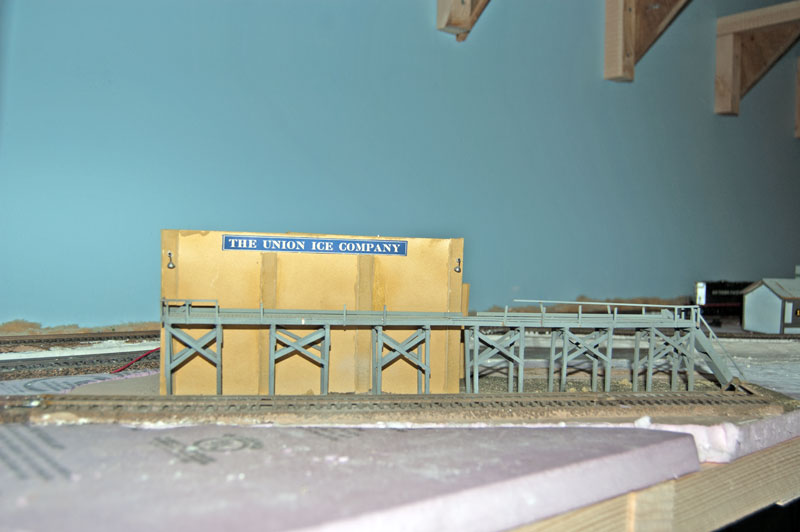
12/17 On to the upper level. I got a few buildings
out of the boxes from Minnesota and tried them in several combinations on the
upper level. Once I had determined how the buildings should be laid out I
could start laying more track.

 there has also been some work done on the storage yard.

12/12 All the track is laid on the helix and across the
connector to the upper level

12/4 Laying the track and testing it.
I figure if a long wheel base, 6 axel diesel and a 6 axel passenger car stay on
the rails everything else will be ok-this proved to be false as I had a short
section of out-of-gauge track that 3 axel trucks handled but 2 axel trucks
didn't.

11/19

 Here we have the helix connected to the start of the upper level
11/13 The helix is up
 but not yet connected to the upper level.
11/12 The helix on it's way up. this was a more time
consuming project than I had imagined it to be.

11/10 The completed helix and the first threaded rods that will hold the helix up.
11/6, The support for the helix.

11/4 The next step is to build the helix that moves the train
from one level to the other. For guidance on building the helix I am
indebted to Bruce Morden who showed me his helix and explained some of the
basics to me. Additional details were found on his excellent blog,
http://spsbsub.blogspot.com/
 This is the helix going together. I used three pieces of .2 inch Luanne
plywood, overlaid and glued together to form the roadbed.
This is the helix going together. I used three pieces of .2 inch Luanne
plywood, overlaid and glued together to form the roadbed.
10/30 The start. I started in the back corner putting in the track that leads around the helix and goes to the storage yard.
 The blue walls are too blue and will get repainted a lighter blue later.
This is my current
layout occupying half of a two car garage. The basic design is a double
decker U with a helix at the top of
 each
arm of the U. in this picture the green lines are the upper level and the
black lines are the lower level. The red lines are the edge of the lower
level. The upper level won't be as wide as the lower level. Right
now I envision 4 basic scenes. Top left will be Salinas Valley packing
sheds and ice plant. Lower left will be Santa Margarita. Lower right
will be San Luis Obispo and top right will be a beach scene-maybe Gaviota.
The bottom of the U will be some transition scenes which are yet to be
determined.
each
arm of the U. in this picture the green lines are the upper level and the
black lines are the lower level. The red lines are the edge of the lower
level. The upper level won't be as wide as the lower level. Right
now I envision 4 basic scenes. Top left will be Salinas Valley packing
sheds and ice plant. Lower left will be Santa Margarita. Lower right
will be San Luis Obispo and top right will be a beach scene-maybe Gaviota.
The bottom of the U will be some transition scenes which are yet to be
determined.